Ecoworx resilient floating installation
1 GENERAL INFORMATION
1.1 Site Conditions
1.2 Substrate Testing
1.3 Storage and Handling
-
Store cartons of tile or plank products flat and squarely on top of one another. Preferably, locate material in the “center” of the installation area (i.e. away from vents, direct sunlight, etc.)
2 APPROVED SUBSTRATES
2.1 Concrete
NEW AND EXISTING CONCRETE SUBFLOORS SHOULD MEET THE GUIDELINES OF THE LATEST EDITION OF ACI 302 AND ASTM F 710, “STANDARD PRACTICE FOR PREPARING CONCRETE FLOORS TO RECEIVE RESILIENT FLOORING” AVAILABLE FROM THE AMERICAN SOCIETY FOR TESTING AND MATERIALS, 100 BARR HARBOR DRIVE, WEST CONSHOHOCKEN, PA 19428; 610‐832‐9585; WWW.ASTM.ORG.
WARNING: DO NOT SAND, DRY SWEEP, DRY SCRAPE, DRILL, SAW, BEAD BLAST OR MECHANICALLY CHIP OR PULVERISE EXISTING RESILIENT FLOORING, BACKING, LINING FELT, ASPHALTIC “CUTBACK” ADHESIVES OR OTHER ADHESIVES.
These products may contain either asbestos fibers and/or crystalline silica. Avoid creating dust. Inhalation of such dust is a cancer and respiratory tract hazard. Smoking by individuals exposed to asbestos fibers greatly increases the risk of serious bodily harm. Unless positively certain that the product is a non‐ asbestos‐containing material, you must presume it contains asbestos. Regulations may require that the material be tested to determine asbestos content and may govern the removal and disposal of material. See current edition of the Resilient Floor Covering Institute (RFCI) publication Recommended Work Practices for Removal of Resilient Floor Coverings for detailed information and instructions on removing all resilient covering structures. For current information go to www.rfci.com.
2.2 Lightweight Concrete
2.3 Wood SubFloors
Wood subfloors must be structurally sound and conform to guidelines of ASTM F 1482 and in compliance with local building codes
-
Particleboard, chipboard, flakeboard, OSB (Oriented Strand Board), hardboard or similar are not recommended sub floor materials and require the additional layer of an APA 1/4" underlayment grade panel.
2.4 Strip – Plank Wood Flooring
2.5 Existing Floor Coverings
2.5.1 Resilient Flooring
-
Cuts, cracks, gouges, dents, and other irregularities in the existing floor covering must be repaired or replaced.
NOTE: THE RESPONSIBILITY OF DETERMINING IF THE EXISTING FLOORING IS SUITABLE TO BE INSTALLED OVER TOP OF WITH RESILIENT, RESTS SOLELY WITH INSTALLER/FLOORING CONTRACTOR ON SITE. IF THERE IS ANY DOUBT AS TO SUITABILITY, THE EXISTING FLOORING SHOULD BE REMOVED, OR AN ACCEPTABLE UNDERLAYMENT INSTALLED OVER IT. INSTALLATIONS OVER EXISTING RESILIENT MAY BE MORE SUSCEPTIBLE TO INDENTATION.
2.5.2 Quarry Tile, Terrazzo, Ceramic Tile, Poured Floors (Epoxy, Polymeric, Seamless)
-
Waxes, polishes, grease, grime, and oil must be removed.
-
Cuts, cracks, gouges, dents, and other irregularities in the existing floor covering must be repaired or replaced.
2.5.3 Raised Access Panel Subfloors
-
Raised access panels must be stable, level, flat, free, and clean of existing adhesives
If needed overlay the panels with a 1⁄4” (6 mm) plywood and properly fasten to the access panels prior to the installation of the floorcovering. Prior to underlayment installation, repair any loose or unstable panels. Use the appropriate installation methods for the product.
2.6 Radiant Heated Floors
The heating system's components must have a minimum of 1/2" separation from the flooring product. The system must be on and operational for at least 2 weeks prior to installation to reduce residual moisture. Three days prior to installation, lower the temperature to 65 degrees, after installation gradually increase the temperature in increments of 5° F to avoid overheating. The maximum operating temperature should never exceed 85°F. Use of an in-floor temperature sensor is recommended to avoid overheating. Contact the manufacturer of your radiant heating system for further recommendations.
2.6.1 Electric Radiant Floors
Consist of electric cables (or) mats of electrically conductive materials mounted on the subfloor below the floor covering. Mesh systems are typically embedded in thin sets. When embedding the system components, use cementitious patching and leveling compounds that meet or exceed Shaw’s maximum moisture level and pH requirements. Use of gypsum-based patching and/or leveling compounds which contain Portland or high alumina cement and meet or exceed the compressive strength of 3,000 psi are acceptable.
2.6.2 Hydronic Radiant Floors
Pump heated water from a boiler through tubing laid in a pattern under the flooring. Typically installed in channels under a wooden subfloor (or) imbedded in concrete slabs.
3 SUBSTRATE PREPARATION
-
All substrates must be structurally sound, clean, dry, and flat prior to installation. Surfaces must be free of contaminants including, but not limited to: dust, dirt, oil, grease, paint, curing compounds, concrete sealers, adhesive residues, loosely bonded toppings, and any other materials or conditions that may inhibit proper adhesion.
-
Substrate flatness must conform to the following tolerances:
-
Maximum deviation of 1/8 inch over 6 feet (3.2 mm over 1.8 m)
-
Maximum deviation of 3/16 inch over 10 feet (4.8 mm over 3.0 m)
-
Fill depressions or cracks with a cementitious patching / leveling compound that meet or exceed Shaw Industries maximum moisture level and pH requirements. Use of gypsum-based patching and/or leveling compounds which contain Portland or high alumina cement and meet or exceed the compressive strength of 3,000 psi (20684 kPa) are acceptable.
- For Dormant cracks wider than 1/32 inch (0.8 mm, repair with Prepworx CJR400 prior to flooring installation.
-
For cracks and saw cuts exceeding 1 inch (25.4 mm) in depth, use Prepworx MRS101.
-
Moisture Mitigation: For new or existing concrete substrates exhibiting moisture levels that exceed the limits specified for products and/or adhesives, reference either of the two systems below for mitigation.
-
Totalworx Moisture Control Solution
-
Totalworx Vapor Barrier Solution
-
Trench Moisture Mitigation: For newly poured concrete trenches (e.g., plumbing), apply a two-part epoxy moisture barrier such as PrepWorx MCS310 to prevent moisture-related flooring failures. Ensure substrate preparation aligns with Shaw’s installation standards.
-
Use Prepworx CJR400 at the interface between new and existing concrete.
-
Extend Prepworx MCS310 coverage across the trench and a minimum of 8 inches (203 mm) onto the adjacent slab.
-
Concrete and terrazzo substrates need to be a minimum CSP 3 (maximum CSP 5) by use of shot/bead blasting.
-
Do not install flooring over substrates that have been chemically abated: Chemically treated surfaces may compromise adhesion and affect flooring performance.
-
Curing compounds: (DO NOT USE). If present, they can interfere with the bond of the adhesive to the concrete. Seek assistance from a substrate manufacturer if curing agents are detected.
-
Silicate-Treated Concrete: Applies to concrete containing an integrally added (admixed) silicate or cured concrete that has received a topically applied silicate treatment.
-
Silicate-Treated Concrete: Confirm the silicate was (Mixed - Integrally Added Silicates) or (Applied - Topically Applied Silicates) in strict accordance with the manufacturer's written recommendations. For topically treated concrete, the slab must be fully cured, and the silicate must have been applied, neutralized, and allowed to dry sufficiently per those recommendations. In all cases, any issues on the project relating to or stemming from moisture remain the exclusive responsibility of the silicate manufacturer.
-
Silicate-Treated Concrete Options:
-
Option 1: VL201 and QL202, prime with QBC300 (whether the concrete is absorbent or non-absorbent), then install the product.
-
Option 2: Install MRS101 at a minimum thickness of 1/8” directly over porous or non-porous concrete without primer, or apply QBC300 primer first and then install MRS101at a minimum 1/8” thickness.
-
Sweeping Compounds: Green sweeping compounds can be used but must be swept and removed immediately.
-
For dusting / powdering / porous concrete / lightweight concrete prime with a latex primer such as 9050.
4 INSTALLATION
Tools: Tape Measure, Utility Knife, Jigsaw, Tapping Block, Dead-Blow Hammer, Pull Bar, 1/4" Spacers, T-Square, Safety Glasses, Broom or Vacuum and, if necessary, tools for subfloor repair.
Installation of 6 mil Poly Film Underlayment is recommended for floating method only in high moisture applications.
For use over concrete substrates - seams MUST be taped.
Note: Do not cover the entire area of the substrate to prevent damage or present a slip hazard. Roll the poly film out one row at a time.
Floating Installation
Ecoworx Resilient plank flooring is designed to be installed utilizing the floating method. Proper expansion space 1/4” (6.35 mm) is required. Undercut all doorjambs. Do not fasten wall moldings and or transition strips to the planks.
Flooring must be installed in a staggered (offset) pattern.

-
Before you start with the installation, it is important to determine the layout of the flooring. Proper planning and layout will prevent having narrow flooring widths at wall junctures or very short length pieces at the end of rows.
-
As with all flooring products, install the flooring parallel to the longest exterior wall.
-
Determine if the starter row will need to be cut. (*In order to have a balanced floor layout, the width of the flooring for the first and last row may need to be cut). The cut width of the flooring should be ½ the width of the flooring. If the first row of flooring does not need to be trimmed in width, it will be necessary to cut off the unsupported tongue so that a clean, solid edge shows towards the wall.
-
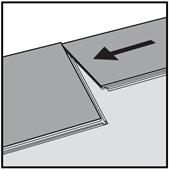
Installation of the product must start from the left side of the room, working to the right when working in front of the flooring or facing the starting wall. Use spacers along the walls to maintain proper expansion space (1/4”) and align the first piece.



-
It is critical to keep the first two rows straight and square, as they are the “foundation” for the rest of the installation. Check for squareness and straightness often.
-
Continue installing planks and make sure to achieve a random appearance with end joint spacing minimum of 8" (20cm). Note: For a more suitable visual on wider and longer planks, increase end joint spacing to 8-10” or 20-25cm. Check that all planks are fully engaged; if a slight gapping is found, the gap can be tapped together by using a tapping block and a scrap of flooring to cover the tapping block in order to avoid damages on the planks.
-
When fitting under door casings, if necessary, a flat pull bar may be used to assist in locking the joints. Doorjambs or at row ends near walls where space is limited, the tongue can be “shaved” and glue containing “cyanoacrylate” can be applied to the groove to join the pieces together.
-
When fitting around obstacles or into irregular spaces, the flooring can be cut easily and cleanly using a utility knife with a sharp blade. It is often beneficial to make a cardboard template of the area and transfer this pattern to the flooring.
-
To fully engage the short end, tap the side seam down with a dead-blow hammer, working from the corner outward. Repeat the process with additional planks to complete each row.
COMPLETION