Axminster - Woven Installation
Carpet with a synthetic secondary backing can be installed by stretching and fastening onto a tackless strip. It must be stretched 1% to 1-1/2% in both the width and length directions with use of a power stretcher. Knee kickers should only be used to move and position carpet. Shaw Industries does not recommend the use of a stretcher hook, stinger, or spike.
Note: Axminster / Base Metal Woven 5A219 can also be installed using the direct glue method. (See Broadloom Installation Guidelines) and double glue method using a commerical grade double glue cushion such as DuraWorx (See Double Glue / DuraWorx Installation Guidelines).
Floor Preparation
The floor must be clean, dry, and free of dirt and debris. Any Indentations or projections in the subfloor which could telegraph through the cushion should be repaired. Missing boards or other damage to wood subfloors should be repaired or replaced. A minimum of 18" of ventilated air space is needed between the floor joists and the ground.
Existent resilient tile or sheet vinyl, should be fastened securely to the floor.
Any loose ceramic, terrazzo and marble tiles should be re-adhered. Broken or missing tiles should be replaced or filled using a latex additive patching compound and grout lines should be leveled.
Conditioning
Dry lay the carpet prior to installation and allow conditioning to a minimum temperature of 65° F degrees and a relative humidity between 10% and 65%. Maintain these conditions for 24 hours prior to, during and permanently after installation.
Tackless Strip
Tackless strips can be nailed into wooden subfloors. Concrete surfaces may require that holes be drilled and anchors or screws be used to secure the strips to the floor. Non- flammable contact or epoxy adhesives can be used to glue down the strips. For larger areas, additional nails or screws must be used.
Place the strips on the floor with the pins pointed toward the walls. The space between the anchored strip and the wall is called the "gully". A small portion of the carpet should be tucked into the gully and hooked to the pins. The proper gully space is approximately 2/3 of the thickness of the carpet and should not exceed 3/8". Do not use tackless strips across door openings or staple carpeting into the strips.
Areas over 30 feet in length or width are difficult to obtain sufficient stretch and can potentially wrinkle. We suggest alternate installation methods in these areas. Whenever stretch-in is necessary, architectural strips, which contain three rows of pins, should be used. Double up residential tackless strips are recommended in lieu of architectural strips.
Radiant heating systems require special attention in order to avoid puncturing the buried hot water pipes in the concrete. To determine the exact location of the pipes, turn off the heat, wet mop the entire floor, and then turn the heat back on. The areas over the hot water pipes will dry quickly and should be marked. Tackless strips can be nailed in if there is no danger of puncturing the pipes. If the concrete will not hold nails or if there is a possibility of puncturing the pipes, then the strips can be glued down.
Cushion
Choose a cushion which is appropriate for the particular end use. An improper selection of cushion may result in buckling and wrinkling.
The cushion selected for commercial installations should meet the requirements for the specific carpet used in order to prevent possible voiding of applicable warranties. If no specific requirements are stated, the thickness of the cushion should be no greater than 3/8". The density should be sufficient to provide adequate support for the carpet.
Cushion seams should be installed at right angles to carpet seams or staggered at least six inches from carpet seams. The longest possible lengths of cushion should be used. When many smaller pieces are used, the cushion may slip or lift at the edges and create resistance during the positioning and stretching of the carpet.
Carpet cushion should be glued to concrete flooring with use of a good quality cushion adhesive. Apply the adhesive using a 15" - 18" zig-zag line around the perimeter of the tackless strip, along the seams, and in the center of the cushion throughout.
Staples can be used to fasten the cushion to wood floors. Place the staples no more than eight inches apart around the perimeter and down the center. Stagger the staples along the seams to prevent depressed lines. With each method the cushion should be secured after all wrinkles are eliminated. Cushion seams should be taped using 2" wide duct tape.
Carpet Layout and Cutting
Carefully cut the carpet into sufficient lengths to cover the area using the seaming diagram following roll sequence as illustrated on the roll tag and bill of lading. Allow enough material to properly match patterned carpeting. Examine each pattern for the size of the repeat before beginning the installation. Please call Shaw Technical Support for more information regarding patterned products.
The following methods are recommended for trimming factory edges prior to seaming. Use the method best suited for the type of product being installed. (See seaming instructions for additional information)
It may be necessary to stretch and stay nail (careful if radiant heated floor) for pattern match correction and to eliminate any fullness or gaps in the seam.
Axmister products- Seam using the row cut method.
Loop / Cut constructed products - When cutting products that are comprised of both loop and cut fibers, it is advised to cut the product on the cut fiber.
Loop constructed products - When cutting products that are comprised of only loop construction, it is advised the cut the product using the blade that is opposite from the edge being seamed and angling the cutter to avoid cutting the yarn.
Apply a bead of thermoplastic seam sealer immediately after cutting the seam.
Cutting Cross Seams
Cross seams should be kept to a minimum. Best seam quality can be obtained by row cutting both seam edges as described for length seams. If the rows do not run straight, the following procedure is recommended.
Determine the pile lay of the carpet and make sure the pile direction will lay into or toward the seam, and then row cut. After row cutting, overlap the row cut edge on top of the adjacent drop, align any patterns from the center, and then trace cut using the row cut edge as a guide. NOTE: Before trace cutting, retract the blades on the cushion back cutter and push through the area to be cut. This will separate some of the yarn and provide a cleaner cut.
If you are unable to find or separate the row, it will be necessary to straight edge the carpet from the face. The following procedure should be used:
- Place a straight edge on top of the carpet with the side pile direction laying into or toward the seam.
- Retract both blades in the cushion back cutter.
- Using the straight edge as a guide, push the cutter with retracted blades along the straight edge cleaning out yarns as best as possible.
- Extend the blade on the cutter which will cut closest to the straight edge and cut the carpet using the straight edge as your guide.
- Overlap the newly cut edge on top of the second drop and trace cut using the previously cut edge as a guide. Before trace cutting be sure to align and match patterns as best as possible.
After the edges are trimmed, immediately apply a bead of thermoplastic seam sealer.
Seaming
- When matching seam edges take precaution with the material touching at the seam, this may cause fibers to fall out and fray.
- Place a board under seam to support the seam /product while seaming.
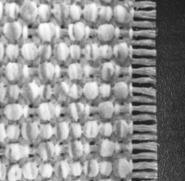
- Prior to seaming pull yarn and stuffer yarn until exposing the white chain stitch as illustrated.
- Apply latex along the edge on both sides pushing the latex into the chain stitch to secure the fiber.
- When the latex is dry (blow dryer can be used to expedite), trim the edge assuring that the chain stitch is not cut.
A premium tape with low melting point is recommended. Six inch wide seaming tape will provide best results when peaking seams is a concern. Back rolling the seam edges and pre-stretching the carpet along the seam area will help minimize seam peaking. An iron with heat shield should be selected. The seaming iron should be set at approximately 2-1/2 and moved at a speed which will completely melt the hot melt adhesive. Construct the seam over a firm surface and run the iron in the direction of the pile, never against the pile. Follow iron with a carpet tractor and non- metal seaming weight. Carpet and seaming tape must be cool to the touch prior to stretching the carpet to prevent the seams from pulling apart.
Patterned carpets may require one side of the seam to be stretched to obtain proper pattern match. Start by setting both edges of the seam into the tackless strip at either the beginning or the end of the seam. Use a power stretcher and / or knee kicker to stretch the shorter patterned side of the seam to proper match. Stay nails may be helpful.
Post Installation Care and Protection
- Use plywood over the carpet when heavy objects are moved within 24 hours after installation.
- Protective chair mats under chairs with casters are recommended. This will prevent excessive wear to the face of the carpet.
- A non-staining building material paper must be placed over the carpet to protect it when additional construction activity is to take place that would soil or stain it. Do not use plastic sheeting as it will trap moisture.
These installation procedures are intended to assist in the installation and care of Shaw carpet under most job conditions. Specific questions regarding installation and maintenance not covered within must be referred to the Shaw Technical Support . Any variance from these procedures will become the responsibility of the installer and not the manufacturer.
Shaw Technical Bulletins are updated as new information becomes available. To determine if this represents the most current information, call 800.471.7429.