Water resistant laminate
Find Your Peace of Mind
Accidents do happen. But Repel Laminate from Shaw gives you time to clean up spills making it easier to protect the beauty of your floor.
Everyday Durability
- Scratch, stain & fade resistant
- Kid & pet friendly
- Easy to install
Typical tools required
- Broom
- Electric Saw (carbide blade)
- Eye and Ear Protection
- Glue
- Hammer
- Painter’s Tape
- Pencil
- Pull Bar
- Straightedge (6 ft)
- Tape Measure
- Utility Knife
- Wall Spacers (3/8”)
- Wood Chisel
Repel Water Resistant Laminate Installation Instructions
Start with tongue side against starting wall working left to right when facing the starting wall.
Preparation
 [1] Do not store cartons near heating/cooling ducts or direct sunlight.
|
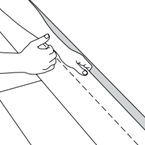
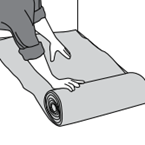 [3] Roll out just enough underlayment for the next few rows of planks you are installing.
|
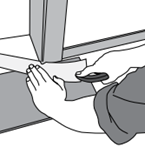 [2] Undercut doorjambs for a professional fit. Doorways less than 36" wide recommend using T-Molding for expansion.
|
 [4] Try to run planks parallel to main light source. T-molding is only required for rooms of more than 2,025 sq.ft.
|
Start of Installation
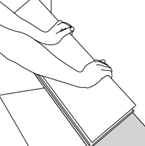
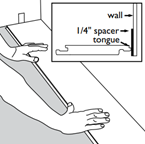 [1] Begin the installation in the left-hand corner. Place the plank a minimum of 3/8" from the left wall. Use the installation spacers throughout all perimeter areas to insure the correct expansion space is maintained.
|
 [3] If the starting wall is uneven, the planks must be adapted to its contours. You can scribe the contour of the wall onto the first row of planks using a 2" square block and a pencil following along the contour of the wall. Do not forget to allow for the minimum 3/8" expansion space from the wall. Disassemble the first row, cut the planks along the line you have drawn, and then reassemble. You will still use the spacers to maintain the expansion space along this wall.
|
|
[2] Assemble the starting row of planks by applying a 1/8" bead of tongue and groove adhesive on the bottom groove lip of each END seam plank.
Place each plank end firmly into the end seam adhesive, position and tape the seams with painter’s tape, or weight them down to insure they remain flush while the adhesive sets.
Use a clean, soft cloth to carefully clean up any excess adhesive on the surface of the planks.
Remember, it is necessary to use adhesive on the end seams of the FIRST ROW ONLY!
If the end seams of the first row are taped securely, it will not be necessary to wait for the adhesive to fully set before continuing with the rest of the installation.
|
 [4] Now remove the first row. Lift the planks a few inches and tap along the joint. Cut the planks as required.
|
 [5] Replace the first row by inserting planks from left to right. Press the first board with the groove toward the edge of the planks that are already in position.
|
 [6] If you wish to remove the flooring, just lift the planks a few inches and tap along the joint.
|
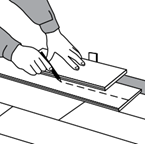
 [7] Place the final plank face down with the short side (without the locking strip) towards the wall. The remaining expansion space should be at least a minimum of 3/8" from the wall. Draw a pencil line where the plank is to be cut.
|
 [12] The distance to the walls can be adjusted when three rows are completed. Remember to place the flooring a minimum of 3/8" from all walls or other vertical obstructions such as cabinets, pipes, or columns.
|
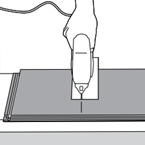 [8] Place the plank face down on the work surface and cut to size with a power saw. If you are using a hand saw, use a fine-toothed blade, and cut the planks face up.
|
 [13] Measure and cut the planks in the last row to fit. Remember to allow for a minimum of 3/8" expansion space from the wall.
|
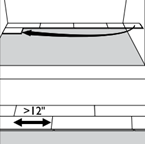 [9] Use a cut piece of board from the previous row to start the next row. This starting plank section must be at least 12" long. If the piece is too short, start with a new board. Cut the new board in one third, one half or two thirds length sections, depending upon what is required to maintain the random stagger from one row to the next. Always ensure that the end joints are staggered at least 12 to 16 inches from one row to the next.
|
 [14] Use a full width scrap plank and 3/8" spacer to mark your cutting line on the last row.
|
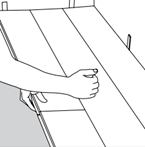
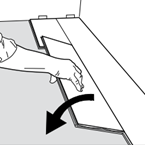
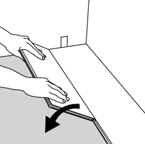 [10] Place the plank at an angle against the plank in the previous row. Press the edge forward against the previous row, and then fold down at the same time.
|
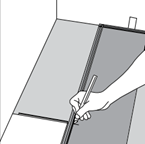
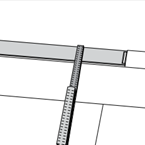
 [15] In areas such as a doorjamb or cabinet kick base where planks cannot be angled to lock into place, use a wood chisel to remove the locking ridge from the bottom of the plank groove. Apply a 1/8" bead of tongue and groove adhesive to the bottom groove, and gently tap the plank into place using a pull bar and hammer. Next, apply enough strips of painter's tape across this seam to hold the joint securely in place until the adhesive sets. Using a clean, soft cloth, carefully clean up any excess adhesive on the surface of the planks.
|
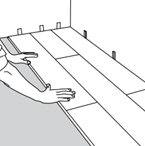
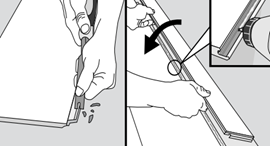
 [11] Connect the planks in the following rows by aligning the end seam of each plank directly above the end seam of the preceding plank. Insert the long side seam at a slight angle first, and as the top surfaces meet, rotate the plank down into the locked position.
|
Preparation
Water resistant Laminate can be installed directly over most existing floor coverings except for carpet. Wood flooring glued to concrete must be removed before installation.
Acclimation
- No acclimation period is required when installation site conditions are climate controlled prior to and during installation of Shaw Laminate Flooring Products. This means that Shaw Laminate Flooring products can be installed faster and more efficiently than conventional alternatives.
- During the installation period, temperature should be maintained between 65° F to 85° F and relative humidity should be between 35% to 65%.
- [1] Do not store cartons near heating/cooling ducts or direct sunlight.
Subfloor Preparation
- Fill any low spots in the subfloor greater than 1/8” in 6 feet with a Portland cement leveling compound. Check this by using a 6’ straight edge. Remove any high spots by sanding or grinding.
- Remove any existing floor molding (if any) except for the wall baseboards.
- [2] To undercut door frames, lay a loose plank upside down against the frame and on top of the underlayment. This will be your guide for proper height to allow installed planks to float under the door frame. Saw the bottom of the doorjamb case molding back to the wall studs so that 3/8” expansion gap is maintained when laminate is fitted under doorjamb case molding.
- Sweep the subfloor clean.
Subfloor Moisture Testing
- On Concrete Subfloor–Always test a concrete subfloor for excessive moisture before installing over concrete, concrete covered with ceramic tile, marble, stone, vinyl tile, or linoleum. To test concrete, use a properly calibrated and reliable concrete moisture meter The maximum allowable moisture content percentage for concrete is 4%. If the moisture meter readings are above 4%, have a qualified floor covering contractor perform a Calcium Chloride Moisture Emissions test. The maximum allowable reading for a Calcium Chloride Test is 5 lbs./ 1,000 sq. ft./24 hours.
- On a Wood-based Subfloor–Moisture content of the wood subfloor must not exceed 12% when checked using a pin-type wood moisture meter. Whenever readings are higher than 12%, full evaluations of the joist systems, crawl spaces or basement areas beneath the wood subflooring are also necessary.
Call the Shaw Information Center at 1-800-441-7429 for more assistance.
Installing Underlayments
When installing products with preattached acoustical underlayment:
- On Concrete Subfloor–use minimum 6-mil polyethylene (plastic) sheeting as a vapor barrier. Roll out the plastic, overlapping the seam area 6 to 8 inches, and tape the seams with a clear plastic sealing tape.
- On a Wood Subfloor–no additional plastic vapor barrier should be installed.
When installing products without preattached acoustical underlayment:
Please read the installation guidelines included with your chosen underlayment, and strictly follow those instructions when installing your underlayment.
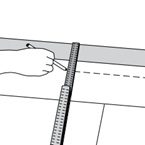
- [3] Unroll one width of underlayment along the longest wall. Always work from left to right. Planks should run lengthwise against the longest wall, and if possible, [4] parallel to incoming sunlight.
- [4] T-mold recommended at all doorways 36” or less that have a door and a frame and every 45 feet in length and width.
Start of Installation
- The width of the first row of planks should be approximately the same width as the last row. This may require cutting the first row plank to a shorter width. Measure across the room (inches) and divide by the width of a plank to see how many full width planks will be used and what size width will be needed for the last row. The last row should never be less than 2” in width.
- Use 3/8” spacers to maintain the proper expansion gap around the entire perimeter of the floor. Quarter Round molding will cover this expansion gap. IMPORTANT: this 3/8” gap must be maintained around cabinets, pipes, toilet flanges and any other obstacles in floor.
- INSPECT EACH BOARD CAREFULLY FOR DAMAGE PRIOR TO INSTALLING IT.
- Do not install a damaged plank. If you have any concern about the product fit or finish, call Shaw Information Services at 1-800-441-7429 for information.
- Check groove on plank to make sure it is clean and free of debris.
Follow installation steps [1]–[15]: Remainder of Floor
- Now you can continue to add additional rows using the same method of assembly. Work on top of your start rows and pull the planks toward you to position them before locking them into place.
- Randomly pull planks from 3 cartons at a time to ensure random appearance. Use cut pieces from the end of each row as starting planks. Always stagger end joints a minimum of 12”; make random so as not to show a repeating pattern.
- All joints should be a tight fit with no gaps. Stop and reconnect if a joint is not tight or if all edges are not even with adjacent planks. These planks can be engaged and disengaged several times if needed to help make a correct installation.
- When cutting the last row, place a full row of planks directly on top of the previous row of installed planks (keeping the tongue in the same direction as that of the installed planks). Use the full width of a scrap piece of plank as a guide. Place a pencil next to the edge and trace a line down the planks following the contour of the wall. Cut planks on the pencil line and then connect the last row.
- Apply silicone caulk to bathtubs, toilets,sink areas, perimeters, any areas in which surface water exposure will occur.
Repel Water Resistant Laminate Care & Maintenance
Repel Water Resistant Laminate is designed to stand up to the toughest household conditions. However, to keep it looking its best, follow these simple instructions for protection and care.
Routine Maintenance
- Use a damp cloth to blot up spills as soon as they happen. Never allow liquids to stand on your floor.
- Use acetone/nail polish remover on a clean white cloth to clean tough spots such as oil, paint, markers, lipstick, ink, or tar. Wipe the area with a damp cloth to remove any remaining residue.
- As a primary cleaning method, regularly sweep, dust, or vacuum the floor with the hard floor attachment (not the beater bar) to prevent accumulation of dirt and grit that can scratch or dull the floor finish.
- As needed, for best results, utilize a dry-damp sponge mop or microfiber mop and a neutral pH cleaner, such as Shaw Hard Surface Cleaner, by spray misting the mop with the neutral cleaner.
- When cleaning, do not saturate the floor with water as this could cause swelling, warping, delamination and joint line separation. Remember, Repel is water resistant, not water proof.
- Do not use steel wool, abrasive cleaners, or strong ammoniated or chlorinated type cleaners.
- Do not use any type of buffing or polishing machine.
- Do not use any type steam cleaner or cleaning device that applies steam or water directly to flooring.
- For spots such as candle wax or chewing gum, harden the spot with ice and then gently scrape with a plastic scraper such as a credit card. Be careful not to scratch the flooring surface. Wipe clean with a damp cloth.
- A more frequent dust-mopping or vacuuming schedule may be required in very sandy areas such as a beach home.
Environmental Protection
- Entry mats will help collect the dirt, sand, grit, and other substances such as oil, asphalt, or driveway sealer that might otherwise be tracked onto your floor.
- To prevent slippage of area rugs, use an approved vinyl rug underlayment.
- Use floor protectors and wide, load-bearing leg bases/rollers to minimize the chance of indentations and scratches from heavy objects. As a rule, the heavier the object, the wider the floor protector.
- To minimize the natural expansion and contraction of the wood, maintain a normal indoor relative humidity level between 35 and 65% throughout the year.
a. Heating season (Dry): A humidifier is recommended to prevent excess shrinkage due to low humidity levels. Wood stove and electric heat tend to create very dry conditions.
b. Non-Heating Season (Wet): An air conditioner, dehumidifier, or periodically turning on your heating will help to maintain humidity levels during summer months.
- Avoid excessive exposure to water during periods of inclement weather.
- Keep your pet’s nails trimmed to prevent them from scratching your floor.
- Never try to slide heavy objects across the floor.
- A protective mat should be used under furniture or chairs with castors/wheels. Repel Laminate Board Replacement Repairs.
- Shaw Repel Laminate may be assembled and disassembled several times.
- Carefully disassembled joints will retain their original locking integrity during reassembly. New replacement plank(s) should be acclimated in the replacement area for at least 72 hours. This allows them to equalize to the conditions of the flooring in the room where the replacement(s) will take place.
- To replace the damaged board(s), first remove baseboard, wall base, or Quarter Round as needed. Take the flooring apart one row at a time. Lift each row to detach, then separate the individual boards.
- Be sure to stack the individual planks in the proper order for re-installation. This usually eliminates the need to cut planks for start or end of the row lengths.
- For best visual results, replace the damaged board with a piece from the edge of the original installation.
- Insert the properly acclimated new plank(s) along the outer edge of the original flooring installation during reassembly. This practice minimizes the chance that a newer plank will stand out from the original installation.
- Reinstall the baseboard, wall base, or quarter round, and the replacement repair is complete.
Warranty: To request a copy of the 30-Year Limited Warranty, please call 1-800-441-7429.
Call Shaw Information Center at 1-800-441-7429 for molding and transition installation instructions.
For complete product and warranty information please visit https://shawfloors.com/flooring/how-to/laminate/warranties or call 1-800-441-7429.
IMPORTANT HEALTH NOTICE FOR MINNESOTA RESIDENTS: THESE BUILDING MATERIALS EMIT FORMALDEHYDE. EYE, NOSE, AND THROAT IRRITATION, HEADACHE, NAUSEA AND A VARIETY OF ASTHMA-LIKE SYMPTOMS, INCLUDING SHORTNESS OF BREATH, HAVE BEEN REPORTED AS A RESULT OF FORMALDEHYDE EXPOSURE. ELDERLY PERSONS AND YOUNG CHILDREN, AS WELL AS ANYONE WITH A HISTORY OF ASTHMA, ALLERGIES, OR LUNG PROBLEMS, MAY BE AT GREATER RISK. RESEARCH IS CONTINUING ON THE POSSIBLE LONG-TERM EFFECTS OF EXPOSURE TO FORMALDEHYDE. REDUCED VENTILATION MAY ALLOW FORMALDEHYDE AND OTHER CONTAMINANTS TO ACCUMULATE IN THE INDOOR AIR. HIGH INDOOR TEMPERATURES AND HUMIDITY RAISE FORMALDEHYDE LEVELS. WHEN A HOME IS TO BE LOCATED IN AREAS SUBJECT TO EXTREME SUMMER TEMPERATURES, AN AIR-CONDITIONING SYSTEM CAN BE USED TO CONTROL INDOOR TEMPERATURE LEVELS. OTHER MEANS OF CONTROLLED MECHANICAL VENTILATION CAN BE USED TO REDUCE LEVELS OF FORMALDEHYDE AND OTHER INDOOR AIR CONTAMINANTS. IF YOU HAVE ANY QUESTIONS REGARDING THE HEALTH EFFECTS OF FORMALDEHYDE, CONSULT YOUR DOCTOR OR LOCAL HEALTH DEPARTMENT.
WARNING! DO NOT MECHANICALLY CHIP OR PULVERIZE EXISTING RESILIENT FLOORING, BACKING, LINING FELT, ASPHALTIC “CUT-BACK” ADHESIVES OR OTHER ADHESIVES. PREVIOUSLY INSTALLED RESILIENT FLOORING MAY CONTAIN EITHER ASBESTOS FIBERS OR CRYSTALLINE SILICA. THE PRODUCTS IN THIS BOX DO NOT CONTAIN ASBESTOS.
AVOID CREATING DUST. INHALATION OF SUCH DUST IS A CANCER AND RESPIRATORY TRACT HAZARD. SMOKING BY INDIVIDUALS EXPOSED TO ASBESTOS FIBERS GREATLY INCREASES THE RISK OF SERIOUS BODILY HARM. UNLESS POSITIVELY CERTAIN THAT THE PRODUCT IS A NON-ASBESTOS CONTAINING MATERIAL, YOU MUST PRESUME IT CONTAINS ASBESTOS. REGULATIONS MAY REQUIRE THAT THE MATERIAL BE TESTED TO DETERMINE ASBESTOS CONTENT AND MAY GOVERN THE REMOVAL AND DISPOSAL OF MATERIAL. SEE CURRENT EDITION OF THE RESILIENT FLOOR COVERING INSTITUTE (RFCI) PUBLICATION “RECOMMENDED WORK PRACTICES FOR REMOVAL OF RESILIENT FLOOR COVERINGS” FOR DETAILED INFORMATION AND INSTRUCTIONS ON REMOVING ALL RESILIENT COVERING STRUCTURES.
WARNING: Drilling, sawing, sanding or machining wood products can expose you to wood dust, a substance known to the State of California to cause cancer. Avoid inhaling wood dust or use a dust mask or other safeguards for personal protection. For more information go to
www.P65Warnings.ca.gov/wood.
Produced under license from Valinge Innovation AB.
Shaw, Shaw Laminate Flooring, LocNPlace, and Repel are trademarks or registered trademarks of Columbia Insurance Company.