Technical Bulletin Hard Surfaces Quality Control
Issue Date: 03/01/2016 (revision 1)
Control Number: CQ-HS-TE045B
Subject: Floorte’ Installation Tips
Author: Bob Grant & Clark Hodgkins
Floorte’ is the most successful launch in Shaw Hard Surfaces history. It solves a multitude of issues by allowing for easier subfloor preparation and eliminating the need for 48 hours of acclimation time. In addition, its fold and tap installation method allows for a superb, long lasting solution for homes, apartments and commercial establishments.
Below is a simple three step process which allows installers to quickly and successfully complete a Floorte’ job.
Note: During installation, you will find that the end seams (short side seams) fit VERY TIGHTLY together. This is absolutely normal and necessary to allow for the flooring, once installed, to resist the penetration of liquids from spills. Further, the tightness of these seams is necessary to guarantee long-lasting performance. Once these end joints are securely locked – they are designed to remain that way.
Use these helpful tips when installing Floorte’:
- When folding a plank down, place the “tongue end” (the plank that is being folded down) into the “groove end” of the installed plank. Make sure the plank ends are aligned squarely with one another.
- Using your thumb, apply firm pressure at points all along the seam. This step securely engages the locking mechanism which consists of two teeth for added stability. It is possible that you can feel and even hear the joint engage at this point.
- Check the seam for ledging (one plank still slightly higher than the other) by rubbing your fingers/hand gently across the seam. Moderate ledging (uneven plank heights at the seam) can still be present at this point. If so, this means that only one of the two locking “teeth” are engaged and that further efforts need to be made to fully engage the locking system. At this point, put VERY firm pressure on the part(s) of the seam where ledging exists. It can be helpful to place the head of the rubber mallet directly onto the seam where ledging exists and apply your weight onto the mallet head by pressing down. After doing this, check for ledging by rubbing your fingers/hand gently across the seam.
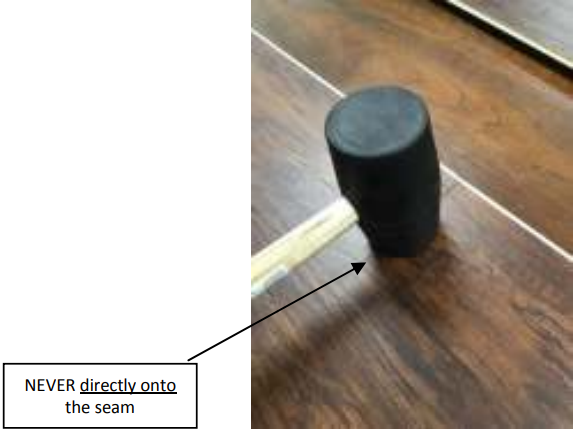
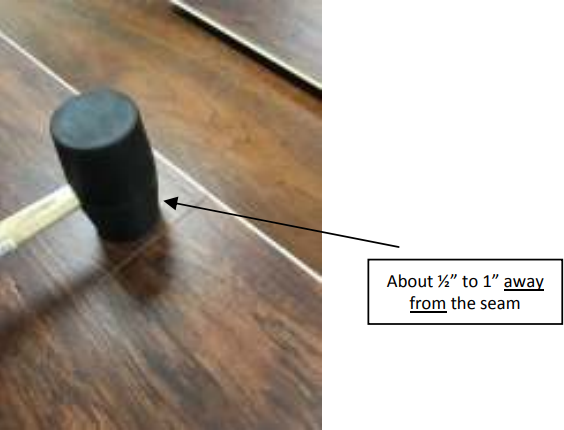
- If ledging is still present, firmly TAP (not a full-fledged STRIKE) all along the seam to fully-engage the lock. IMPORTANT: When TAPPING along the seam, DO NOT tap directly onto the seam (photo on left). Instead, the mallet head should strike about 1/2 inch to 1 inch away from the seam ON THE TONGUE SIDE (photo on right).
 Incorrect mallet position
 Correct mallet position
NOTE: NEVER use the mallet strike to engage the seam until it is first engaged by using direct pressure (PRESSING, NOT TAPPING) from your thumb or from the mallet head. Directly striking the seam with a mallet at this point can and will easily damage or destroy the tongue’s locking mechanism. At this point ledging will remain permanently as the joint will no longer lock and may even move freely with pressure at the seam indicating a failure to lock.
NOTE: NEVER, EVER tap directly onto the seam. ALWAYS tap about 1/2" to 1" away from the seam ON THE TONGUE SIDE. Tapping directly onto the seam with a mallet can and will easily cause the “locking teeth” to be destroyed and or tongue to drive straight through the groove bottom resulting in a failure to lock and permanent ledging.
Questions or comments about HSQC technical communications should be routed through the Hard Surfaces Quality Control department as follows:
Hardwood and associated sundries issues – Mark Barnett (706) 965-0742
Hard surfaces technical/installation/warranty issues – Len Daubler (706) 532-7588
Laminate, tile and stone, resilient and associated sundries issues – Greg Wilkins (706) 965-0744
General quality and claims issues – Chris Willingham (706) 275-5415
General quality issues and concerns – Bob Grant (706) 965-0770