DuraTru / Non woven resilient Flooring Installation Guide
Full Spread
General Installation Information
The full-spread professional installation method is the required installation process for all SHAW DuraTru sheet vinyl products. This installation method provides optimal performance of the vinyl and should be used in any area over 500 square feet, in heavy traffic areas, kitchens and home offices.
Materials required for installation
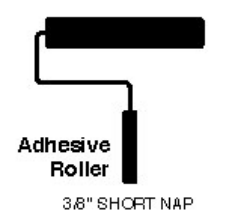
| 3/8” short nap paint roller |
| SV350 Pressure Sensitive Releasable Adhesive |
| (spread rate porous-350/ non porous -400 sq.ft./gal.) |
| SHAW 4062 Premium Seam Sealer |
| Acrylic Double Face Tape |
| Sharp Utility Knife |
| Straight edge Push broom |
Acceptable Underlayments
Wood underlayment
- Wood underlayment panels must be underlayment grade as specified and warranted by the manufacturer. Always fasten underlayment panels in accordance with the manufacturer’s recommendations. Any failure of the underlayment or DuraTru flooring as a result of the underlayment is NOT the responsibility of SHAW Industries Inc.
- DO NOT install over sleeper construction subfloors or wood subfloors applied directly over concrete.
Concrete
- VCT (well bonded, free of any wax, polish or other contaminates)
- Ceramic (well bonded and grout joints leveled with cementitious patching/leveling compound)
- Terrazzo (well bonded)
- Resilient floor (no more than 2 layers, well bonded, non-cushioned, non-embossed)
-
Radiant Heating: Radiant-heated subfloor systems can be concrete, wood or a combination of both.
The heating systems components must have a minimum of 1/2" separation from the flooring product. The system must be on and operational for at least 2 weeks prior to installation to reduce residual moisture. Three days prior to installation lower the temperature to 65 degrees, after installation gradually increase the temperature in increments of 5° F to avoid overheating. Maximum operating temperature should never exceed 85°F. Use of an in-floor temperature sensor is recommended to avoid overheating. Contact the manufacturer of your radiant heating system for further recommendations.
- Electric Radiant Floors: consist of electric cables (or) mats of electrically conductive materials mounted on the subfloor below the floor covering. Mesh systems are typically embedded in thin-set. When embedding the system components, use cementitious patching and leveling compounds that meet or exceed Shaw’s maximum moisture level and pH requirements. Use of gypsum-based patching and/or leveling compounds which contain Portland or high alumina cement and meet or exceed the compressive strength of 3,000 psi are acceptable.
- Hydronic Radiant Floors: pump heated water from a boiler through tubing laid in a pattern under the flooring. Typically installed in channels under a wooden subfloor (or) imbedded in concrete slabs. Requires the installer follow a specific nailing pattern to avoid penetration of the heat system.
- Concrete floors shall be flat and smooth within 1/8" in 6 feet or 3/16” in 10 feet.
- F‐Number System: Overall values of FF 36/ FL 20 may be appropriate for resilient floor coverings.
- Use cementitious patching and leveling compounds that meet or exceed Shaw’s maximum moisture level and pH requirements. Use of gypsum-based patching and/or leveling compounds which contain Portland or high alumina cement and meet or exceed the compressive strength of 3,000 psi are acceptable.
- Gypcrete can be utilized when necessary due to radiant heat and in high rise buildings. Gypcrete must be sealed with Shaw 9050 primer coating to stabilize the surface for adhesive bond. All issues with gypcrete cracking, crumbling, powdering and/or resulting in the release of adhesive bond are NOT warranted by SHAW Industries Inc.
- Do NOT install over perimeter bonded vinyl, soft-back vinyl, cork or any floating floor product.
- Crumb rubber underlayments are not an acceptable option for use with resilient floor coverings due to performance issues resulting from chemical incompatibilities.
FLOOR PREPARATION
- Floor must be clean, smooth, flat and dry. Remove all foreign substances such as wax, grease, dirt and any substance or chemical that would interfere with a good bond.
- If the adhesive residue is asphalt‐based (cut‐back), or any other type of adhesive is present, it must be removed by industry accepted methods such as mechanical removal or wet scraping.
- If a chemical abatement has been performed, use Shaw Surface Prep EXT to remove any residual chemicals present. Once Shaw Surface Prep EXT has been properly cleaned and removed, apply one coat of Shaw MRP for additional protection.
Adhesive removal through the use of solvents or citrus adhesive removers is not recommended. Solvent residue left in or on the subfloor may affect the new adhesive and floor covering.
WARNING! DO NOT SAND, DRY SWEEP, DRY SCRAPE, DRILL, SAW, BEAD BLAST ORMECHANICALLY CHIP OR PULVERISE EXISTING RESILIENT FLOORING, BACKING, LINING FELT , ASPHALTIC “ CUT BACK” ADHESIVES OR OTHER ADHESIVES.
These products may contain either asbestos fibers and/or crystalline silica. Avoid creating dust. Inhalation of such dust is a cancer and respiratory tract hazard. Smoking by individuals exposed to asbestos fibers greatly increases the risk of serious bodily harm. Unless positively certain that the product is a non‐asbestos‐containing material, you must presume it contains asbestos. Regulations may require that the material be tested to determine asbestos content and may govern the removal and disposal of material. See current edition of the Resilient Floor Covering Institute (RFCI) publication Recommended Work Practices for Removal of Resilient Floor Coverings for detailed information and instructions on removing all resilient covering structures. For current information go to
www.rfci.com.
- Fill all holes and cracks with a leveling compound. Sand high spots to eliminate the possibility of telegraphing.
- Prime floor if needed to prevent over absorption of adhesives, contain dust, and to insure a better bond of the adhesive to the subfloor, with Shaw 9050.
- Moisture levels of concrete slabs before, during and after installation must not exceed 5 lbs. per 1000 square feet per 24 hours using an anhydrous calcium chloride test according to ASTM F-1869, and pH must be between 5 and 9; or, if using ASTM F-2170 In-Situ Probes the Relative Humidity should be less than 75% relative humidity.
Inspection of flooring material prior to installation is required. Any defects should be immediately reported to the retail store from which the flooring was purchased before installation. The installer is responsible for labor costs to repair or replace material with defects that were apparent before or noticed at the end of an installation.
DuraTru vinyl can be installed over OSB using the full spread method. In order to assure a positive outcome, the following six requirements MUST be observed carefully and completed as directed:
- OSB underlayment panels must be APA rated as underlayment grade as specified and warranted by the manufacturer.
- Underlayment panels and joints must be fastened and reinforced according to manufacturer’s instructions.
- Completely sand the floor with a floor sander, so that the floor is smooth and flat. Note: The chips in OSB overlap. Without sanding properly, OSB has high and low spots throughout the floor that could telegraph through DuraTru vinyl.
- Vacuum the floor with a power vacuum so that it is dust free.
- Prime surface using Shaw 9050 Primer and allow to completely dry.
- Follow full-spread installation instructions.
Installation Steps
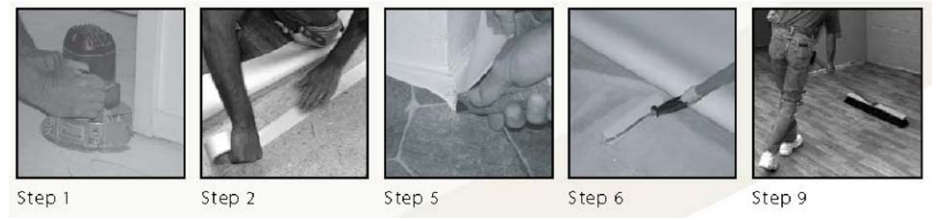
Step 1 Prepare substrate in order for the surface to be clean, smooth, flat and dry. Under cut all door jambs to maintain a 1/8” relief gap.
Step 2 Place acrylic double face tape at all doorways where a transition strip is needed, next to sliding doors, in front of tubs and shower stalls, and similar areas where an expansion gap will not be covered with trim. Place double face acrylic tape around all floor vents to eliminate air migrating under vinyl causing bubbles. Do not tape along walls or around perimeter of room.
Step 3 Align the pattern with the most dominant wall to achieve the best appearance in the room. Using a sharp utility knife, trim away excess material along the walls, at cabinets, etc., leaving approximately 2” of vinyl at these areas to be trimmed off later (rough cut)
Step 4 IF A SEAM IS REQUIRED PLEASE FOLLOW THE INSTRUCTIONS FOR SEAMING.
Step 5 Make relief cuts at corners and projections to allow the material to lay flat before the final cuts are made. Final trimming should be done by cutting in with a utility knife or trimmer leaving a 1/8” to 1/4” expansion gap. The gap allows for sub-floor movement caused by changes in atmospheric conditions.
The material should not touch the wall or corners at any point or bubbles or wrinkles may occur.
The material must lay flat to stay flat.
Final cuts must be made prior to applying adhesive.
Step 6 LAP fold back material one half at a time and roll on a thin consistent layer of SV350 Pressure Sensitive Adhesive with the 3/8 inch short nap paint roller.
Step 7 Before laying material back, make sure the adhesive is completely dry (should be tacky to the touch). There should be no transfer of adhesive to material. (If needed, a fan can be used to accelerate drying time.)
If the adhesive is not completely dry before installation of material, the adhesive will continue to release gasses causing bubbles under the vinyl material.
Step 8 Position the material in place so that no shifting can occur. Do not lift the vinyl into place because it may shift slightly and wrinkle.
Step 9 Starting in the center of the floor, remove air from under material using a push broom (broom method).
Do not use any type of flooring roller, i.e. 75 or 100 pound.
Do not twist material when placing it onto the adhesive.
Step 10 Repeat steps 6-8 for the remaining half of the flooring material.
Step 11 Use quarter round or baseboard to cover the exposed expansion gap. When installing quarter round or any moldings, make sure that they are fastened only to the wall, and do not pinch the material at any point.
* Material not installed in accordance with SHAW recommended guidelines, including any and all problems caused by the use of non- recommended adhesive, seam sealer, underlayment and/ or improper preparation of the substrate are not covered under the SHAW warranty system.
Seaming Instructions In A Full-Spread Installation
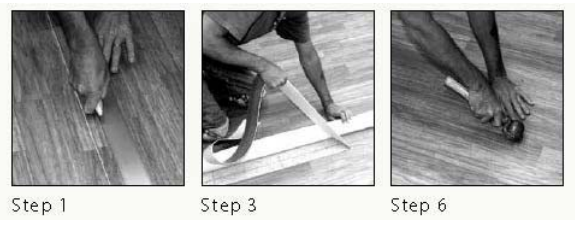
- After adhesive is rolled on and completely dry position the flooring by over-lapping the seam edges. (Make sure to match pattern.)
- With a straight edge and a sharp utility knife, cut through both layers of flooring material (double-cut) at the designated match point. Make sure the utility knife blade is held in an upright position for a clean 90 degree cut.
- Remove and discard waste material.
- Fold back about 8” of the vinyl on one side of the seam and apply a small bead of SHAW 4062 Premium Seam Sealer to one edge of the vinyl that is on the floor.
- Tuck the seam edges together and wipe off excess sealer with a clean, damp cloth.
- Use a resilient flooring type hand roller (or wallpaper seam roller) to squeeze out any remaining sealer from the seam. Immediately clean seam with a damp cloth followed by a clean, dry cloth.
- Protect the seam and allow it to dry (approximately 6 hours).
LOOSE LAY INSTALLATION METHOD: Up to 500 square feet and only 1 seam
Note: Rolling chairs, rolling microwave stands, appliances, heavy furniture and pivot points like those in front of a sink or work area may cause wrinkling in loose-lay applications. In these areas we highly recommend the fullspread method with pressure sensitive adhesive.
- Prepare substrate in order for the surface to be clean, smooth, flat and dry. Under cut all door jambs to maintain a 1/8” relief gap. (If metal jamb - must leave 1/8” expansion gap and caulk with 100% silicone caulking before completing job.)
- Align the pattern with the most dominant wall to achieve the best appearance in the room. Using a sharp utility knife, trim away excess material along the walls, a t cabinets, etc., leaving approximately 2” of vinyl at these areas to be trimmed off later (rough cut).
- Place acrylic double face tape at all doorways where a transition strip is needed, next to sliding doors, patio door sills, in front of tubs and shower stalls and similar areas where an expansion gap will not be covered with trim. Place acrylic double face tape around all floor vents to eliminate air migrating under vinyl causing bubbles. Do NOT tape along walls or around perimeter of room.
- Apply an “X” of acrylic double-face tape under appliances and pivot points.
- Cut in material leaving a 1/8” expansion gap around the perimeter of the room and cabinets.
- Make relief cuts at corners and projections to allow the material to lay flat before the final cuts are made. Final trimming should be done by cutting in with a utility knife or trimmer leaving a 1/8” to 1/4” expansion gap. The gap allows for sub - floor movement caused by changes in atmospheric conditions. The material should not touch the wall or corners at any point or bubbles or wrinkles may occur. The material must lay flat to stay flat.
- Use the push broom method to thoroughly remove the air from under the vinyl. Make certain all air is removed.
- Use quarter round or base board to cover the exposed expansion gap. When installing quarter round or any moldings, make sure that they are fastened only to the wall and do not pinch the material at any point.
Seaming in a Loose-Lay Application
- Position the flooring by over-lapping the seam edges. (Make sure to match pattern.)
- With a straight edge and a sharp utility knife, cut through both layers of flooring material (double cut) at the designated match point. Make sure the utility knife blade is held in an upright position for a clean 90 degree cut.
- Remove and discard waste material.
- Carefully fold back about 6” - 8” of the vinyl along both edges. Apply a strip of double face tape where the seam edges come together. Press tape firmly to subfloor. Remove backing from the top of the tape and carefully lay back one edge over the tape.
- While the other edge is still folded back apply a small bead of Shaw 4062 Premium Seam Sealer to the edge of the vinyl that is on the floor.
- Tuck the seam edges together and wipe off excess sealer with a clean, damp cloth.
- Use a resilient flooring type hand roller (or wallpaper seam roller) to squeeze out any remaining sealer from the seam. Immediately clean seam with a damp cloth followed by a clean, dry cloth.
- Protect the seam and allow it to dry (approximately 6 hours).
Additional Instructions
- Always inspect the flooring thoroughly before installation.
- DO NOT slide heavy appliances or furniture over or across the flooring. Always lift objects and place them on the flooring or reposition appliances and furniture using professional moving glides or carpet with the pile side down.
- In-floor heat/AC registers may rest on the vinyl floor, but leave space under registers that are attached to the floor or wall. They should not pinch the flooring material.
- Use permanent 100% silicone caulk next to bathtubs, showers, sliding doors or similar areas.
- For bathroom installations, it is not necessary to remove the toilet. Make relief cuts around the perimeter of the toilet and make sure the vinyl flooring is laying flat before trimming off the excess material. Apply permanent flexible 100% silicone caulk around the toilet, next to bathtubs and showers to prevent moisture from getting under the vinyl.
Note: if there is ceramic sanitary cove and no place to install trim mold, you can apply caulk around the walls.
- Make sure furniture legs have large surface, non-staining floor protectors. Replace small, narrow metal or domeshaped glides with smooth, flat glides that are in flat contact with the floor. Place chair pads underneath rolling chairs to prevent damage to the LVT flooring.
-
- Do not use a trowel for application of pressure sensitive adhesive.
- Never use tape around the perimeter of the room.
- Never apply SHAW Duratru sheet vinyl to wet adhesive. This could cause permanent bond or wrinkling.
- For Metal door jambs that cannot be undercut, leave an 1/8” expansion gap and caulk with 100% silicone caulking.
- Do not use tape to secure floor protection during construction or renovation. Use ram board or similar to protect the floor.
Shaw does not warrant installers’ workmanship. Workmanship errors should be addressed to the contractor who installed the floor. Your Shaw floor should be professionally installed by contractors who have demonstrated expertise in installing resilient floors.